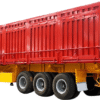
Standing there before my empty flatbed trailer, the clang of chains echoing in the early morning air, I know this isn’t just about stacking cargo. Getting it wrong? That’s a recipe for disaster on the highway – shifted loads, damaged goods, or worse, a serious accident. Over the years hauling everything from steel beams to machinery, I’ve learned that safe flatbed loading starts long before the first item touches the deck; it begins with a solid plan, the right gear, and a hefty dose of respect for the physics involved.
My first hard lesson came early, watching a pallet shift dangerously after hitting a bump because I skimped on dunnage. That gut-check moment burned into me why understanding your cargo’s weight distribution and center of gravity isn’t just technical jargon – it’s the absolute bedrock of flatbed safety. Whether you’re loading pipe, lumber, or crates, figuring out exactly where and how that weight sits across the trailer axles is crucial; overload one end or leave something unbalanced, and you’re asking for trouble before you even hit the interstate.
So, how do I approach loading my flatbed trailer safely every single time? It boils down to a methodical system I stick to religiously: proper preparation of the trailer deck, strategic placement of the load itself based on its unique characteristics, and then – this is non-negotiable – securing it down with the right combination of straps, chains, binders, and edge protection, applied with proven techniques. It’s not glamorous, but mastering these steps is what separates a smooth, incident-free run from a potential catastrophe waiting to happen miles down the road.
Inspect the Flatbed Trailer’s Deck and Components

Before you put anything on the flatbed trailer, I think it’s really important to check the deck. You should also inspect all other parts. Doing this is key for safety and to stop accidents before they happen.
Flatbed Deck Inspection Checklist
- Check Deck Surface: I suggest you make sure the trailer deck has no holes, cracks, or rotten spots. These things could weaken the deck and make it unsafe.
- Look for Hazards: I recommend you inspect for any metal sticking out or sharp edges. Also, look for damaged body panels. These could damage your cargo or hurt someone.
- Examine Skirting and Fairings: I advise you to confirm all skirts, fairings, and side panels are attached well. They should show no signs of damage.
- Verify Visibility Aids: In my experience, it’s good to check that reflective tape and reflectors are in the right spot. They also need to be in good condition so people can see the trailer clearly at night.
- Assess Structure: I recommend you inspect the bed, sides, and frame. Look for any bends, rust, or other problems with its structure.
Component Inspection Steps
- Kingpin & Coupler: I recommend you make sure the kingpin and upper coupler show no heavy wear. They must be attached well.
- Landing Gear: I suggest you confirm the landing gear is stable. It should operate with ease and not be damaged.
- Doors and Tailgate: You should check all doors, panels, ends, and tailgates. Make sure they latch well and work as they should.
- Tilt Mechanisms (If Equipped): If you have a tilt deck trailer, I advise ensuring the tilting parts work right. There should be no leaks, and they shouldn’t feel hard to move.
- Controls & Hydraulics: I recommend testing all manual and powered controls. This includes hydraulic and electrical systems, to make sure they all work completely.
- Outriggers: If your trailer has outriggers, I suggest you verify they deploy, retract, and lock without any problems.
Wheel and Tire Condition
- Tires: I recommend inspecting each tire. Look for good tread depth, no flat spots, and no dry rot or other clear defects.
- Wheel/Rims: I suggest you make sure wheels and rims are not damaged. Also, make sure you tighten all nuts to the right amount.
- Bearings & Hubs: In my opinion, it’s wise to spin the wheels. Check if they move easily and make no noise. This usually means the bearings are in good condition.
Safety Equipment I Suggest You Check
- Lights & Signals: I recommend you test brake lights, signals, and running lights. This makes sure they all work.
- Braking System: You should check the trailer’s braking system. This includes the emergency brakes. They must work right away and every time you use them.
- Connection Points: I advise inspecting the coupler, safety chains, and hitch. Make sure they are attached well and have no cracks or other problems.
Documentation and What I’ve Seen With Company Policy
- In my experience, it’s always a good idea to fill out all inspection papers. You should include these papers in your shipping packet.
- Based on what I know about safety, I suggest management should do random checks of trailers. They can decide how often by looking at potential risks. Doing this helps everyone follow the rules and can help find issues that might otherwise be missed.
Check Weight Limits and Your Vehicle’s Capacity

I suggest you check both weight limits and your vehicle’s capacity before loading a flatbed trailer. Doing this is key for safety and following the law.
| Category | Details |
|---|---|
| Verifying Weight Limits |
|
| Trailer Weight Capacities |
|
| Weight Documentation |
|
| My Practical Tips for Staying Within Weight Compliance |
|
I Suggest You Wear the Right Personal Protective Equipment (PPE)
When you’re loading a flatbed trailer, I think it’s important to use the right Personal Protective Equipment (PPE). This gear helps keep you safe. It can prevent many common injuries.
What I Consider Essential PPE for Flatbed Trailer Loading
Gloves: I always recommend using gloves if you’re loading cargo, tarping, or securing loads. Based on my experience, gloves protect your hands. They safeguard against cuts, scrapes, and other injuries that can often happen while you work.
Safety Footwear:
I suggest you choose steel-toed boots. These protect your feet if something heavy drops.Look for boots with slip-resistant soles. Loading areas can become slick, so stable footing is key in my opinion.I also recommend boots with puncture-resistant bottoms. This helps stop sharp objects from going through and injuring your feet.From my perspective, good ankle support and comfortable insoles are important. They can make long jobs less tiring.
My Thoughts on High-Visibility and Other PPE
High-Visibility Clothing: I recommend you wear an ANSI Class 1 safety vest. You should wear it any time you are near loading docks or moving vehicles. I believe this is key. Why? It makes you easy to see. Forklift operators and truck drivers can spot you more easily. This simple step, in my experience, helps lower the chance of accidents. I’ve seen how important this is; a bright vest can make a big difference in busy areas.
Other Protective Gear I Find Useful:
I suggest using eye protection or goggles. You’ll need these if there’s a chance of flying dust or small bits of material.If you are loading in loud areas, I recommend you wear earplugs or other hearing protection. Your hearing is precious!
Fall Protection: If your job means you have to work on top of the flatbed, please know that standard PPE isn’t enough. I want to point out that real fall protection can be tricky. Here’s why: most flatbed trailers don’t have the right anchor points. These points need to hold at least 5,000 pounds (that’s about 22.2 kN) for each worker. This is a requirement under regulation 1910.140(c)(13)(i). So, finding a secure anchor is often a big challenge.
My Tip: Meeting OSHA Regulations
I suggest you make sure all the PPE you choose meets OSHA standard 1910.132. This standard outlines the general rules for personal protective equipment you use at work. Following these rules is important for your safety and for your employer.
Position the Flatbad Trailer on Level, Stable Ground

I can’t stress enough how important it is to put your flatbed trailer on ground that is level and stable. This is key for loading safely and making sure your cargo’s weight is spread out right.
Why Level Ground Matters for Flatbed Trailer Loading
Prevents Tipping and Shifts: If your trailer isn’t level, the cargo can bunch up on one side. I’ve seen this happen, and it really raises the chances of the trailer tipping over or the load moving when you’re on the road.Improves Load Distribution: How level your trailer is impacts how the weight spreads out. If the ground isn’t even, you might get poor balance. This can make handling the trailer unsafe.Supports Secure Load Fastening: When your trailer is on a stable, level spot, you can figure out how to secure your load much better. FMCSA rules say all cargo must be secured. Trust me, it’s simpler and safer to do this when your trailer isn’t at an angle.
Steps to Prepare the Trailer for Safe Loading
Check Trailer Levelness: Before you load anything, take a look to see if the trailer is flat. I recommend using a carpenter’s level or the bubble levels on your trailer to be sure.Choose the Right Surface: I suggest you park your trailer on ground that is stable and even. Steer clear of soft dirt, hills, or spots with potholes. Concrete or solid gravel lots are good choices.Pre-Load Inspection: Once the trailer is level, check for any loose bolts, nuts, or damage to its structure. Doing this helps make sure the trailer can support the load. It also helps you find any problems that could affect stability.Optimize Weight Placement: From my experience, it’s best to put about 60% of your load in the front half of the trailer. Place heavier things in the center. Also, keep the load as low as you can to help maintain a low center of gravity.
Flatbed Loading Best Practices
Start Loading in the Middle: I recommend you spread the weight by starting in the middle and then loading towards the sides. Think of it like balancing a tray of food; good balance stops things from tipping.Confirm Stability Throughout: Check often that the trailer is stable while you’re loading. If you see it start to tilt or dip on one side, stop and fix it.If you make sure your trailer is level and stable before each load, you’ll cut down on accidents. This also makes the whole loading job much simpler and safer, in my opinion.
Stabilize the Flatbad Trailer and Chock the Wheels

I think making sure your flatbed trailer stays put during loading is super important for safety. If your trailer moves just a bit, it can lead to accidents or damage your stuff. I’m going to share some key steps and safety tips for keeping your trailer stable and chocking it well.
Why Proper Stabilization and Wheel Chocking Matter
Prevent Trailer Movement: Even a tiny movement can make loading unsafe. I believe both the trailer and your tow vehicle need to be completely still.Protect Your Equipment: Using brakes and chocks takes the strain off your transmission. These systems are made just for stopping and holding heavy loads.Meet Legal and Safety Requirements: Keeping your trailer stable is a legal safety rule for commercial transport.
Key Steps to Stabilize Your Trailer
Engage Brakes First: I always recommend putting the parking brake on all the way before you do anything else. I suggest you never depend just on the transmission to hold a loaded trailer—brakes are what you need for this.Chock All Wheels: I advise placing heavy-duty wheel chocks snug against the tires. Put them on both sides of the trailer and both sides of your tow vehicle. Based on my experience, do this every single time, even if the ground looks flat.Put in Park After Braking and Chocking: Once the parking brake is on and the chocks are set, then you can shift the vehicle into park. Doing it this way helps avoid putting too much stress on your transmission.
Loading Scenarios and Best Practices
If you’re loading by yourself:
- From my perspective, stomp that parking brake down hard.
- Make sure to chock each side of every trailer wheel.
- Also, chock both rear wheels of your tow vehicle.
- Then, and only then, put your vehicle in park.
If you’re loading with a spotter:
I recommend shifting your vehicle into neutral. This takes the load off the transmission.Ask your helper to keep steady pressure on the brake pedal. This engages both the truck and trailer brakes at the same time. It locks the whole setup and stops it from moving.
Proper Wheel Chocking Technique
Choose the Right Chocks: I suggest using chocks that can handle your trailer’s weight or more. If you have a heavy flatbed trailer, you’ll need strong, big chocks.Firm Placement: Make sure you place chocks snugly against the tires, on both the front and back.Level Surface: I always put chocks on ground that’s stable and flat. They might slide if you use them on soft dirt or loose gravel.Never Skip Chocking: In my opinion, you should never skip this. Even on a flat, paved area, a little slope or a bump could shift a very heavy load.
Additional Stability Methods
Trailer Jacks: If you’re parked for a while, I recommend lowering the trailer jacks to the ground. This adds more security.Stabilizer Jacks: To get the best stability, I suggest using stabilizers on all corners. This makes the trailer more rigid and stops it from swaying.Trailer Stands: When you’re loading very heavy gear, I think it’s a good idea to use industrial trailer stands under the frame.Sway Control Devices: If it’s windy, or you need the trailer to be super stable, I recommend attaching sway control bars. These help control any movement you don’t want.
Safety Equipment Checklist
- Gloves: I always wear gloves when I handle chocks or secure a load.
- Steel-Toed, Slip Resistant Footwear: I suggest wearing these to protect your feet from rolling chocks. They also give you good grip on any surface.
- Accessibility: Based on my experience, it’s best to keep your wheel chocks where you can get to them easily and use them quickly.If you follow these steps for stabilizing and chocking, I believe you’ll keep yourself and your gear much safer every time you load.https://www.youtube.com/watch?v=OotSe5ycyEg
Create a Load Placement Plan
I believe a good plan for loading your flatbed is key for safety. It also helps you haul things well. First, I recommend you check the trailer’s top gross weight. Also, look at the axle limits. For example, a standard 5-axle semi should be under 80,000 lbs total. This means 12,000 lbs on the steer axle and 34,000 lbs for each tandem.
Key Steps for Smart Load Placement
60/40 Weight Distribution: I suggest you try to put about 60% of your total cargo weight in the front half of the trailer. The other 40% should go towards the back. From my experience, doing this makes the trailer much more stable. It also helps stop the trailer from swaying when you’re driving.Heaviest Items Over the Axles: I always place the heaviest cargo right over or just in front of the trailer axles. I also make sure to keep these items low to the deck. This gives you a low center of gravity, which I find is good for stability.Maintain Side-to-Side Balance: I make sure to spread the weight balanced from left to right. If the weight isn’t balanced, it can make the trailer hard to handle. It also raises the chance of overloading a tire or the trailer rolling over.Order of Stacking: After you’ve placed the heavy items firmly, I add lighter cargo. You can put it on top or at the ends of the trailer. I always check that the stack stays balanced.
Match Cargo to Trailer Dimensions: Most standard flatbed trailers I see are 45–48 feet long and 8.5 feet wide. I advise you to ensure your cargo’s size and weight are within these limits. This helps you steer clear of safety problems and fines.Adjust for Cargo Type: I think it’s important to look at the shape, size, weight, and how fragile each item is. If you have oddly shaped or very large freight, you might need to position it in a special way. You may also need more tie-downs.Cargo Example: Let me give you an example. If I’m hauling steel coils or heavy machines, I cradle and block the coils well. Machinery, in my opinion, should sit right above the axles. I recommend using rated straps or chains for tie-downs. You’ll want to pick the right method for each type of cargo.
Load Placement Plan Checklist
I always double-check all trailer and axle weight limits. I also measure the trailer dimensions before I start loading.My advice is to plan your whole cargo layout before you start. Don’t try to figure it out as you go.I suggest you pick tie-down devices that fit each cargo item. Then, check every tie-down before you hit the road.In my experience, if you follow these steps carefully and use good data for your load plan, you’ll cut down on accident risks a lot. You’ll also haul more efficiently and meet all DOT rules.
How I Spread Load Weight on My Flatbad Trailer
From my experience, making sure weight is spread out right on your flatbed trailer is super important. It keeps you safe, your trailer stable, and helps you follow the law. If you don’t load it correctly, I’ve seen trailers sway or even roll over. You might also have mechanical problems, blown tires, or get fined. Here’s what I suggest to get it right:
My Tip: Follow the 60/40 Load Weight Rule
I suggest putting about 60% of the total cargo weight in the front half of the trailer. Put the other 40% near the rear.This balance helps your trailer stay straight. It also reduces the chance of sway when you’re on the road.
Where to Put Heavy Cargo? Over the Axles!
I advise loading your heaviest items right over, or just a bit in front of, the trailer axles.I always place these items low on the deck. Make sure they are centered from front to back and side to side.
This lowers the trailer’s center of gravity. This is a big deal for stability and good handling. It’s very helpful when you turn or need to stop fast.
Keep Your Load Balanced Side-to-Side
I suggest you spread the cargo weight so it’s balanced from left to right.I never stack more weight on one side. If you do, the trailer might not handle well, and it puts too much stress on the tires.
For example, if the load tilts a bit to the right, those tires carry more weight. This can cause blowouts or problems keeping the trailer on track.
I Urge You: Check Weight Limits and Axle Ratings
Before you load, I recommend you check your trailer’s Gross Vehicle Weight Rating (GVWR). Also, look at the weight limits for each axle.For a typical 5-axle semi, the most you can legally carry is often 80,000 pounds gross. This breaks down to 12,000 lb for the steer axle and 34,000 lb for each tandem set.I strongly advise you never go over these ratings. Doing so can make your insurance void and lead to penalties.
I also suggest you balance weights within 10% between the axles.
If your load is spread unevenly beyond this 10% difference, you could face DOT fines. For instance, I know that in Texas, if your axles are too heavy during a roadside check, you’ll get a ticket.
What Happens If You Don’t Load It Right?
From what I’ve seen, if you load your trailer poorly, you’re asking for trouble. Your trailer might sway or even roll over. Tires can get overworked, you could have mechanical breakdowns, and you might get fined by the DOT.When you carefully use these load distribution guidelines I’ve shared, I believe you protect yourself. You also protect your equipment and other people on the road. This ensures your flatbed trailer hauling is safe, stable, and meets all legal requirements. That’s my recommendation for stress-free hauling.
How I Load Cargo Using Proper Equipment and Techniques
To ensure your flatbed transport is safe, legal, and efficient, I always use the correct loading equipment and methods I trust. I’ll explain my approach step by step. My top priorities are safety, compliance, and protecting your cargo—and your wallet.
How I Select Equipment Rated for Your Cargo
Match Securement Devices to Cargo Type and Weight:
I use winches and straps for most general freight. For machinery or other dense, heavy loads, I make sure to use heavy-duty chains and binders.For example, if a winch is rated at 5,500 lbs and it’s paired with a 5,400 lb-rated strap, my working limit becomes 5,400 lbs.I always check the working load limit (WLL) of every component in my securement system.The lowest-rated part sets the maximum load. I am careful never to exceed this limit.For spools and pockets, I consult the equipment manufacturer. The WLL can change depending on the angle of the strap or chain, so this check is important based on my experience.
How I Follow Federal Cargo Securement Regulations
Meeting Official Tie-Down Requirements:
Federal rules state that I must anchor cargo to the trailer. For this, I use devices like steel strapping, synthetic webbing, chains, wire ropes, cordage, chocks, and wedges.The specific equipment and method I select depend on the cargo’s weight and its characteristics.As a standard practice, I use at least one tie-down for every 10 feet of cargo.
For example, a 22-foot-long load placed next to a header board gets at least three of my tie-downs.If that same load is centered on the trailer, I use four tie-downs.I ensure the combined WLL of my securement gear adds up to at least 50% of the cargo’s total weight.For freight that is bulky or has an unusual shape, I often find it necessary to use more tie-downs or extra securing equipment.
My Best Practices for Flatbed Load Placement
My Method: Front-Heavy, Centered Loading:
I place around 60% of the cargo’s total weight in the front half of the trailer. The other 40% I position toward the rear.I always load the heaviest items first. I place them directly over, or just in front of, the axles. I also keep them low on the deck.Based on my experience, this practice lowers the center of gravity and improves the trailer’s stability.I load lighter cargo after the heavy items. I stack these lighter items with care on top or at the trailer ends.I also focus on keeping the weight balanced across the trailer’s width. This ensures proper handling and helps me avoid overloading the tires.
My Securement Checklist for Every Load
I verify the truck and trailer gross and axle weight limits. For instance, a standard 5-axle semi usually has an 80,000 lbs gross limit, a 12,000 lbs steer axle limit, and a 34,000 lbs limit per tandem.I plan the load placement for proper distribution: typically 60% of the weight in the front and 40% in the rear, with the heaviest items placed over the axles.I select devices with the appropriate WLL. I inspect their condition thoroughly and confirm the manufacturer’s specifications.
I use at least one tie-down for every 10 feet of cargo length. The combined WLL of these devices must be at least 50% of the total cargo weight.Before I start driving, I double-check that every tie-down is tight and applied properly. This is a step I never skip.
Here Are Some Examples of How I Place and Secure Loads
If I am hauling 40,000 lbs of freight, I make sure my securement devices together offer at least a 20,000 lb working load limit.For a 22-foot load, I use at least three tie-downs if I place it against a headboard. I use four tie-downs if I center it on the trailer.
A Key Point from My Experience: Incorrect Equipment or Loading Leads to Risks
In my years on the road, I’ve learned that improper securement, using weak straps, or not following placement rules can cause serious issues. This might mean load shifts, losing cargo, damaging the trailer, or getting DOT violations.
Therefore, I always prioritize using the correct, rated equipment. I make absolutely sure it’s applied the right way for every load I haul. For me, this is the best way to maximize safety and steer clear of penalties.
Secure Your Cargo with the Right Tie-Downs
In my experience, securing your cargo the right way is key for flatbed trailer safety and meeting DOT rules. I always make sure to use the correct type and number of tie-downs. This keeps your load steady, no matter if you’re carrying machinery, pallets, or building supplies.
Types of Tie-Downs I Use for Flatbed Trailers
Direct Tie-Downs
These go straight from the trailer to the load. They don’t go over or around your items. Here’s something important I’ve learned: direct tie-downs only support half of their working load limit (WLL). This is because the force isn’t shared across the whole tie-down.
Indirect Tie-Downs
These pass over, through, or around your cargo. Then, you hook them to both sides of the trailer. I find that indirect tie-downs use their full WLL. This gives them more strength for the same WLL rating.
How I Strap Down Cargo
- Hook Attachment: I put the hooked end of the strap through the trailer’s outer rail or anchor point.
- Attach Beneath the Trailer: I connect it to the underframe or built-in anchors. This gives a solid hold.
- Position Straps Over Cargo: I roll up each strap, then toss it carefully over the load. I adjust them so they cover the cargo evenly.
- Secure on Opposite Side: I guide the strap through winch slots or securement points on the other side of the trailer.
- Tighten and Remove Slack: I twist the winch handles to remove any slack. I make sure all straps are flat and not twisted.
- Winch Bar Finish: I put the winch bar tip into the winch side hole. Then, I lower the bar until I feel the strap is tight and secure.
Minimum Tie-Downs I Follow (Federal Rules)
For Small, Light Loads (≤5 ft and ≤1,100 lbs): I use at least one tie-down.For Heavier or Longer Loads:For cargo ≤5 ft but over 1,100 lbs OR >5 ft but <10 ft (no matter the weight): I use at least two tie-downs.For cargo over 10 ft long: I use two tie-downs for the first 10 ft. Then, I add one more for each extra 10 ft or any part of an extra 10 ft.If Cargo Isn’t Blocked From Moving Forward: I always use these minimums. This helps stop the load from shifting if I have to brake hard. I think this is a critical safety step.
Where I Attach Tie-Downs
I make sure to hook tie-downs to strong, stable parts of the trailer, such as:
– Trailer edge rails
– Built-in tie-down anchors in the trailer bed
– Sturdy outer frame members
From my experience, never use anchors that are damaged or rusted. They might fail when you need them most.
Staying Compliant and Preventing Failure
I know that DOT rules state every tie-down must be attached and secured. This means it can’t come loose, unfasten, open, or release while I’m driving. I always check each connection and tighten it before I start my trip. I also make it a habit to double-check each tie-down after the trailer has moved even a little bit.
My Thoughts on E-Track Systems (For Enclosed Trailers)
If I’m hauling with an enclosed or utility trailer, I sometimes use an E-track system for extra security. Here’s how I use it:
I attach ratchet straps or shoring bars straight into the E-track rails along each trailer wall.I find E-track is great for loads that are tall, boxed, or have unusual shapes.I’ve learned that not all E-track systems work well for goods that might shift or are on pallets, so I always check my cargo type first.
Understanding Working Load Limits (WLL) – What I Do
I always add up the WLLs of my tie-downs. This ensures they meet the federal rules for securing my load.The total WLL of all tie-down devices I use needs to be at least 50% of my cargo’s total weight.It’s important to know that the weakest part in any tie-down system (like a strap, hook, or anchor) sets your maximum safe WLL. I always check this carefully.
My Personal Tip: I make it a rule never to use a strap or chain if I can’t easily read its WLL tag or engraving. For instance, if I have a 22-foot load up against a headboard, I will use at least three tie-downs. If the load is in the center, I use four. In both cases, I make sure the total WLL is at least half the cargo’s weight. This gives me peace of mind.
In my view, if you pick the right securement devices, carefully follow the federal tie-down minimums, and always check your WLL, you’ll keep your load safe. This also helps you avoid expensive DOT penalties. It’s about doing the job right and protecting your haul.
My Way to Cross-Check Tie-Downs and Working Load Limits (WLL)
I believe securing cargo correctly on a flatbed trailer is critical. It’s not just for safety; it’s a legal requirement. I’ll share how I double-check my tie-downs. I also apply the Working Load Limit (WLL) rules. This system helps me stop cargo from moving and keeps me clear of DOT violations.
How I Inspect Tie-Downs for Safety and Rules
Check All My Gear: Before any trip, I look over all my straps, chains, and ratchet binders. I check for cuts, worn areas, bent hooks, or broken ratchets. If I find bad chains or frayed straps, I replace them right away.Stop Them From Loosening: I make sure every tie-down is attached. It must not come loose, unfasten, or open when the trailer is on the road. I always re-check that they are engaged and tight.Keep It Pushed Down: Each tie-down needs to push down with force. This force should be at least 20% of the cargo’s weight. This stops the cargo from moving up and down. I use my body weight and a winch bar to make each strap very tight.
My Rules for Minimum Tie-Downs Based on Cargo
Heavy Vehicles (think bulldozers, loaders, forklifts): I use at least four tie-downs. Each one must have a Working Load Limit (WLL) of at least 5,000 lbs. These tie-downs need to stop movement in all directions: forward, backward, side-to-side, and up and down. Based on my experience, this is crucial.Chains For Heavy Gear: When I haul very heavy loads, I always use G70 (Grade 70) marked chains. I choose these because they are rated for securing heavy equipment. In my opinion, cheaper, unmarked chains are just not safe.Using Rub Rails: My trailer has rub rails. When I can, I secure tie-downs on the inside (inboard) of these rails. I find this helps cut down on wear and the chance of them snagging.
How Many Tie-Downs I Use for Different Item Sizes
- Small Load (≤5 ft, ≤1,100 lbs): I use 1 tie-down.
- Small but Heavier Load (≤5 ft, >1,100 lbs) or Medium Load (>5 ft, <10 ft, any weight): For these, I use 2 tie-downs.
- Long Loads (over 10 ft and not blocked at the front): For these items, I use 2 tie-downs for the first 10 feet. Then, I add 1 more tie-down for each extra 10 feet, or any part of an extra 10 feet.
- Crawler Equipment (tracks/wheels): I always secure these with at least four tie-downs. From my experience, this is essential for stable transport.
Protecting Edges and Ensuring Material Strength
How I Protect My Straps and Chains: If a tie-down touches a sharp edge or rough part of the cargo, I use edge protectors. I choose ones that resist crushing, cutting, and rubbing. I do this to protect my straps and also to follow DOT rules. It’s a simple step that saves trouble.Using Strong Blocking/Bracing: Any wood or gear like chocks, cradles, or wedges I use has to be strong. It needs to support all the cargo’s weight. It must not split or get crushed.
My Extra Steps for Securing Special Equipment
Handling Articulating Equipment: When I transport vehicles or gear with moving frames (like knuckle-boom cranes or articulated loaders), I take extra care. I lock the articulation joint. Or, I use more restraints. This stops them from shifting.Securing Accessories: I always lower and secure any accessories. Items like booms, plows, shovels, and crane arms each get their own tie-downs. I think it’s best to secure them individually.
My Pre-Trip and On-the-Road Checks
My Final Walkaround Routine: Once I’ve tied everything down, I walk around and check every strap and chain. I look for any tags I missed or any hardware that’s loose. I feel this step is vital.Checks While Driving: I make it a point to stop within the first 50 miles of my trip. I check and retighten all the tie-downs. I do these checks again at every stop, or about every 150 miles. It’s not just for the law. I’ve learned from experience that straps can loosen on bumpy roads or after sharp turns.
My Tip: I suggest you never take chances with tie-down quality or using too few. From what I’ve seen, the cost of a load shifting or falling is much higher than spending a few extra minutes when loading. I always carry extra straps, edge guards, and G70 chains. This way, I’m ready for any type of freight I need to haul.
My Guide to a Final Walk-Around Inspection for Flatbed Trailer Safety
I always recommend a complete final walk-around inspection before you haul any load on a flatbed trailer. In my experience, this check helps you find any problems you missed. It also helps make sure your trailer, cargo, and how you’ve tied everything down meet safety rules and official standards.
My Step-By-Step Checklist for the Final Flatbed Trailer Inspection
| Inspection Category | Details |
|---|---|
| Inspect the Trailer Structure | Check that the trailer looks square and straight. Look for bends, sagging, or frame damage.
Inspect frame rails and crossmembers for cracks, bends, or missing fasteners. Inspect the floor for holes or damaged spots that could make the load unstable. |
| Secure All Connections and Parts | Verify all latches, hinges, tailgate, and locking pins are closed tight.
Ensure the hitch ball or kingpin matches the coupler and is fastened tight. Trailer must sit level once hitched to the tow vehicle. Confirm safety chains are crossed, attached securely, and at the right height. |
| My Final Tire and Brake Check | Check all tires for cuts, bulges, exposed cords, or uneven tread wear.
Ensure tires are inflated to the manufacturer-recommended psi (noted on sidewall). Inspect brakes to confirm they’re adjusted for extra weight and working properly. |
| Lighting and Electrical Systems Check | Turn on all lights and signals (running lights, brake lights, turn signals). Ensure all bulbs function.
Inspect wiring harnesses for loose plugs or frayed wires. |
| My Cargo Securement Walk-Around Check | Confirm all straps, chains, and tie-downs are tight, undamaged, and properly rated for load weight.
Ensure loads are anchored securely and don’t move; pull on each tie-down. Inspect anchor points for rust, cracks, or other weaknesses. |
| My Final Review of the Coupling System | Verify fifth wheel jaws have locked securely around the kingpin.
Ensure release handle is locked and double-check it. Perform a slow tug test with trailer brakes engaged to confirm coupling security. Inspect coupler mechanism for proper lubrication (avoid too much grease, dry spots). Confirm the tractor supports trailer weight (landing gear up). |
| My Spot Check for Documentation and Compliance | Record trailer number/unit ID and VIN/serial number.
Verify license plate and USDOT number are visible and match paperwork. Note any issues in inspection paperwork to ensure proper documentation and regulation compliance. |
My Final Tip: I always walk around the entire trailer one last time. I look from different angles for anything that seems out of place, is missing, or looks loose. I believe even a small issue can turn into a big hazard on the road. This habit, based on my experience, is the best way I know to secure both your load and give you peace of mind.
summary
Based on my years on the road, I’ve learned that making sure a flatbed load is secure is about building habits. These habits should feel natural, not just like following a checklist. I always do a final walk-around. When I see my cargo is secure, I feel confident starting my journey. I spend extra minutes on important checks. I double-check tie-downs and verify weight distribution. I make sure all items are in place and won’t shift. I believe this protects my load and, more importantly, everyone else on the road. I always recommend taking the time to do it right, every single time. In my view, there are no shortcuts to safety in our line of work.
FAQs
-
Q: What’s the MOST important rule for weight distribution on a flatbed?
-
A: The 60/40 Rule is paramount. Aim to place approximately 60% of the cargo weight in the front half of the trailer (ahead of the axles), and the remaining 40% towards the rear. This ensures proper weight transfer to the tractor’s drive wheels (for traction) and maintains stable steering. Never overload the rear, as this can cause dangerous trailer sway or even lift the tractor’s steering tires off the ground.
-
-
Q: What’s the best way to secure different types of cargo?
-
A: Use the right tool for the job and combine methods:
-
Straps (Ratchet Straps, Winch Straps): Ideal for most solid, non-slippery loads (lumber, machinery, crates). Use edge protectors on sharp corners. Ensure adequate Working Load Limit (WLL) and proper tension.
-
Chains & Binders: Essential for extremely heavy, dense, or irregularly shaped loads (steel coils, large equipment). Use grade 70 or higher transport chains with appropriate lever or ratchet binders. Always use hooks with safety latches or grab hooks.
-
Dunnage (Lumber, Mats, Blocks): Prevents shifting, provides a level base, protects cargo, and allows straps/chains to get proper grip and tension. Place strategically under and between items.
-
Tarps & Nets: Protect cargo from weather and road debris, and also help contain smaller items or prevent light materials from blowing away, adding a layer of security. Secure them tightly to avoid tearing or creating a “sail” effect.
-
-
-
Q: How do I handle loads that are wider or longer than the trailer deck?
-
A: Extreme caution and legality are key:
-
Permits: You will almost always need special oversize/overweight permits from state DOTs. Obtain these before loading.
-
Visibility: Use oversized load signs, flags (typically red/orange, 18″ square), and required lighting (amber rotating/strobe beacon at the highest point, front/rear/side marker lights). Follow specific flag placement rules for overhangs.
-
Escorts: Wide/long loads often require pilot/escort vehicles. Know the requirements for the states you’ll travel through.
-
Clearance: Plan your route meticulously to avoid low bridges, narrow roads, or tight turns. Measure the load accurately.
-
Secure Overhangs: Ensure overhanging sections are well-supported and secured to prevent bouncing or shifting, which can damage the load or trailer.
-
-
-
Q: How often should I check my load during transit?
-
A: Perform a detailed inspection:
-
First Stop: Within the first 25-50 miles after initial loading. Cargo often settles or shifts initially. Re-tension straps/chains as needed.
-
Regular Intervals: Stop and check at least every 3 hours or 150 miles, and always after any significant event (hard braking, swerving, rough road section, hitting a large bump).
-
After Breaks: Check during every driver break (fuel stops, meals, rest breaks).
-
Visually: While driving, use your mirrors frequently to monitor tarps, straps, and the load profile. Pull over immediately if anything looks loose or shifted.
-
-
-
Q: Why is properly tarping a load so important for safety, beyond just protection?
-
A: Improperly secured tarps pose significant driving hazards:
-
“Sail” Effect: A loose, billowing tarp acts like a sail, catching wind and causing severe trailer sway or instability, especially at highway speeds or in crosswinds. This can lead to loss of control.
-
Blow-offs: Loose tarps or debris can fly off, creating dangerous projectiles for following vehicles, potentially causing accidents.
-
Reduced Visibility: Flapping tarps can obscure your brake lights, turn signals, or load indicators.
-
Damage: A loose tarp can tear, flap against the cargo (causing damage), or get caught in wheels/undercarriage.
-
Secure tightly using rub rails, stake pockets, and sufficient straps/bungees designed for tarping. Avoid wrinkles and pockets where wind can catch.
-
-